- Details
- Written by Tech Notes
- Published: 06 April 2018
Steps to get 4th party SSL Certificate installed for cpanel client via non-root WHM.
Introduction.
This article is for using a non-root cpanel WHM (WebHost Manager) to generate a server self generated digital SSL certificate, it's CSR (Certificate Signing Request), and the RSA Private Key for your client's cpanel. A cpanel client may be an internal customer, or an external customer, or other, but it does not matter. This article applies to shared servers, cloud servers, dedicated servers, virtual server, reseller server, and any other server that has cpanel WHM deployed (running) on it. It includes mistakes to avoid, and suggestions.
Please notice that this site is dependent on financial contributions (donations), and the ads on this website have very little financial contribution towards funding the creation of articles and website operation.
It took about 3 hours to create this article.
Steps.
- Login to the needed server WHM.
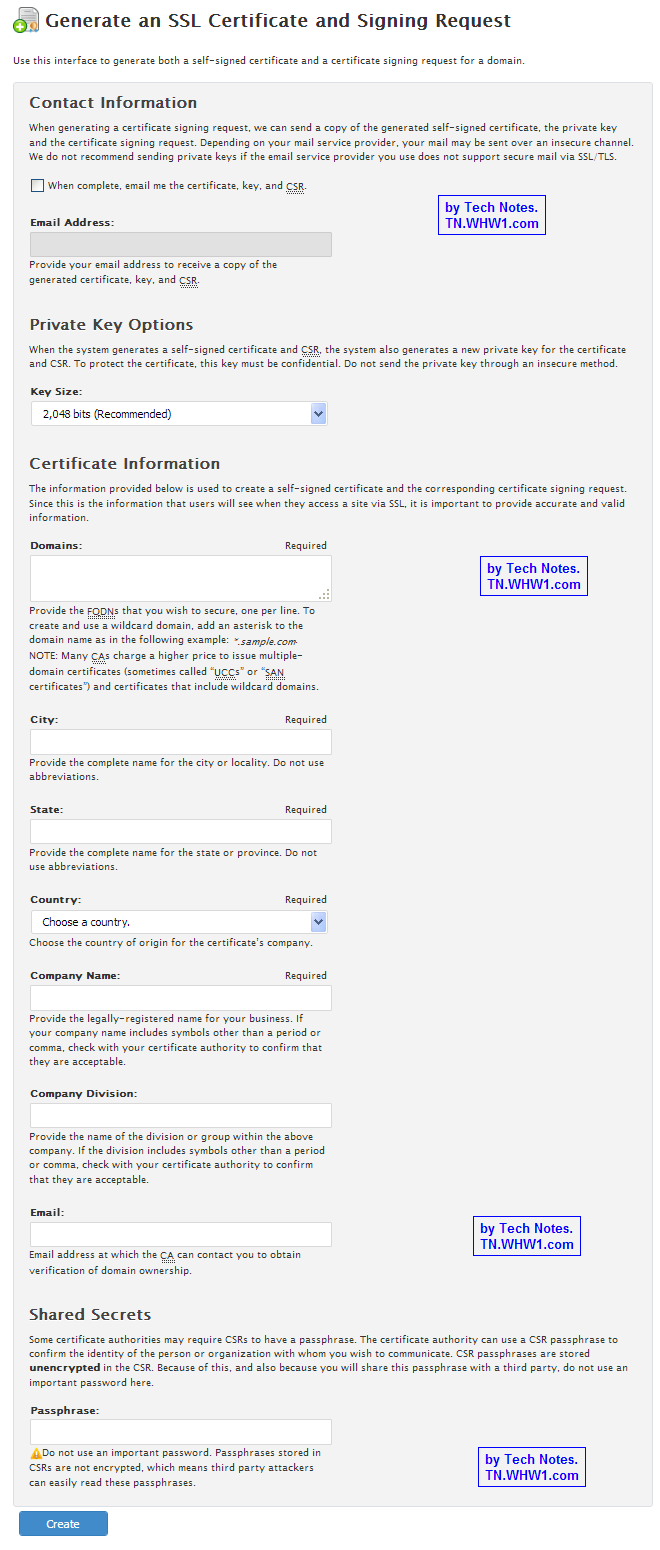
- Complete WHM CSR form: Click on “Generate a SSL Certificate and Signing Request” on left menu.
- Contact Info.
- Email Address: Leave the checkbox Empty. You will copy from display screen in later step. This is the Email Address the CSR, the Key, and server self generated Cert will be sent to, and email is unsecure method of communication. If used, then make sure it will be one of your email addresses.
- Private Key Options.
- Key Size: 2048 or 4096.
- Certificate Info.
- Email: Indicates the Email address client wants associated with the certificate. Best if client or you create an email alias for client for this use.
- Domains: This is the Host Domain Name (Host) to make cert for. Enter the Domain Name only, unless specifically for a Hostname (subdomain of Domain Name); either would be a FQDN. Usually, this is the main domain of the cpanel. A cert issuer like AstraGate Domain Services, or Starfield will make the certificate good for the domain with and without the www host name in front.
- City: Enter city shown on public whois for domain name.
- State: Enter fully spelled state name shown on public whois for domain name.
- Country: Enter 2 letter country code shown on public whois for domain name.
- Company Name: Simply put the domain name, unless client requests something different.
- Company Division: Simply put the domain name, unless client requests something different.
- Email: Indicates the Email address client wants associated with the certificate. Best if client or you create an email alias for client for this use.
- Shared Secret.
- Passphrase/Password. This can be left blank, but you can enter a newly generated password. This is NOT secured. “CSR passphrases are stored unencrypted in the CSR”. If password assigned, make a record of it.
- Generate CSR and Key: Click on Create. The WHM form will generate a CSR (Certificate Signing Request), a server self-signed certificate, and a Key (RSA Private Key). These three items will all be displayed immediately, and emailed to the email address indicated in the field of “Email Address the Cert will be sent to” if it’s checkbox was checked (default should be unchecked).
- Copy all 3 items generated; CSR, Key, and Certificate. Copy each into a separate Notepad (or other simple non-format adding editor) and save. Make the Key file name end with a .key.
- Create a folder named New-SSL-Files within client’s cpanel home directory.
- Email the CSR to the cpanel client. Make sure it is asked that the cert files be uploaded to the server via cpanel’s secure File Manager tool or secure SFTP into the folder named New-SSL-Files within the home directory of client’s cpanel file system.
- Wait for client to upload needed cert files to server: Wait for client to respond with the SSL Certificate (.crt, or .cer files) and the SSL CA Certificate (Trusted Authority / "CA Bundle") the client got from the SSL certificate issuer.
- Make a backup copy of client’s cert files (or download).
- Upload the WHM generated Key into the New-SSL-Files folder and add an extension name of .key.
- Have your system administrators (or yourself if you got root WHM access too) process the installation of the SSL certificate using the files within the New-SSL-Files folder.
- Once SSL install is completed, then check https works.
- Inform client that SSL Cert Install is complete.
- Remove contents of the New-SSL-Files folder within client’s cpanel file system.
Note.
If the client wants to make use of the self-signed server generated SSL certificate instead of purchasing an SSL certificate, this can be done by simply using the certificated created by WHM in the above steps. Modern browsers will issue a warning, or flag, or completely block self generated SSL cert, even though valid, if the cert was not issued by a recognized CA (Certificate Authority). An https based on a self generated SSL certificate will be just as secure as an https based on a CA SSL certificate.
Consider Contributing
- Article Contribution:
Consider submitting an article of your own to Tech Notes. I will create a sub-category for your article if needed. Guest articles are welcome! - Financial Contribution:
If you found this article or any Tech Notes article useful, or beneficial in any form, and you'd like to make a financial contribution as a simple thanks (no fear, any small amount can be given), you can use the Paypal contribution button which is safe and does not require you to have a Paypal account to make a contribution to Tech Notes.
Feel Free To Leave A Good Comment,
And Donate. :)
Comment as a guest or site user.
Polite comments please.
Look around this site and it's menus, and you may find other useful articles.
Add this site to your Bookmarks/Favorites for easy return for new articles.


