

Mass Upload (Update/Replacement) Of Email Forwarder (Alias) Addresses In cPanel
When using cPanel, you have the ability to backup all of your email forwarders (aliases) addresses by going to the Backup icon, and scrolling down to Download Email Forwarders, and clicking on the domain name listed in the Forwarders column.
 ---->
----> 
However, you will quickly realize using the Upload button, seen above, with a list in the the proper format does not replace or update the email forwarders. So, how does one update the email forwarder all at once?
The following explains how to import multiple email forwarders at once in cPanel. If you got a large number of email aliases/forwarders, this can be a huge time saver.
- Login to your cPanel (such as that provided by Web Hosting With $1).
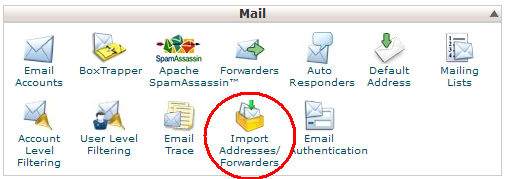
- In the Mail section, click on Import Addresses/Forwarders.
- Select Forwarders, and click on Browse.
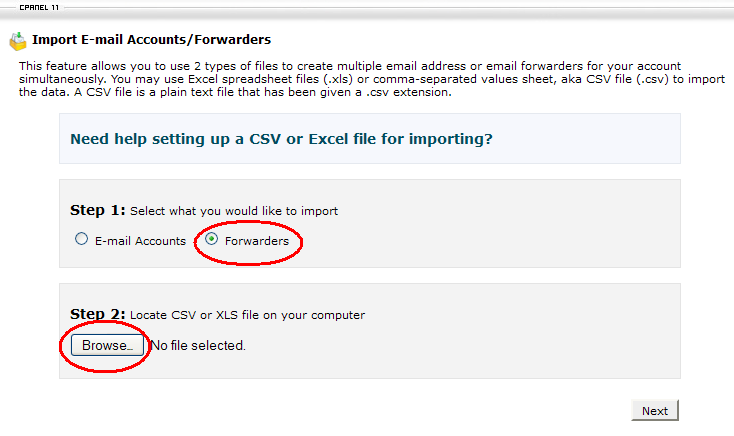
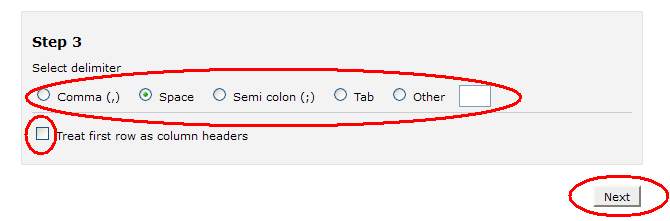
- Select a .csv or excel file you have prepared ahead of time (An example line of such a file is given, but the details of the format of that file is not covered in this article; click on the "Need hlep setting up a CSV or Excell file for importing" to get assistance on this). Once you have selected your file, then the page will update with new option to choose. Select the appropriate delimiter (most likely space, or comma), and if you have not header labeling for each column, then uncheck the checkbox of "Treat first row as column headers". Then push Next.
An Example of a space (or :space) delimited text file for import is:Source: Target
This email address is being protected from spambots. You need JavaScript enabled to view it.: This email address is being protected from spambots. You need JavaScript enabled to view it.
This email address is being protected from spambots. You need JavaScript enabled to view it.: This email address is being protected from spambots. You need JavaScript enabled to view it.
An Example of a comma delimited (csv) text file for import is:Source,Target
This email address is being protected from spambots. You need JavaScript enabled to view it.,This email address is being protected from spambots. You need JavaScript enabled to view it.
This email address is being protected from spambots. You need JavaScript enabled to view it.,This email address is being protected from spambots. You need JavaScript enabled to view it.
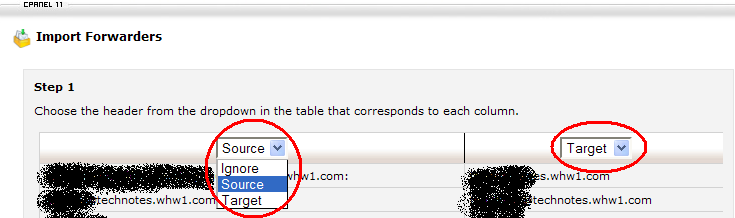
- Now select which column will be the Source (receiving addresses) and which will be the Target (forwarded to addresses). Typically, the first column is the Source and the second column is the Target.
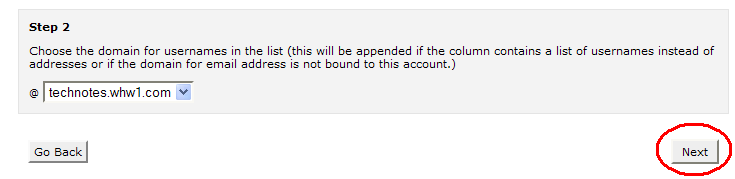
- If your import list is not a full email address, and just a list of username, then you should select from the Step 2 menu of that page to indicate what domain name the usernames are to be at in order to make a complete email address. Normally you do not need to do this. Next push Next.
- You get a chance to do a final review before submitting for upload of the forwarders. If all looks correct, then click the Next button.

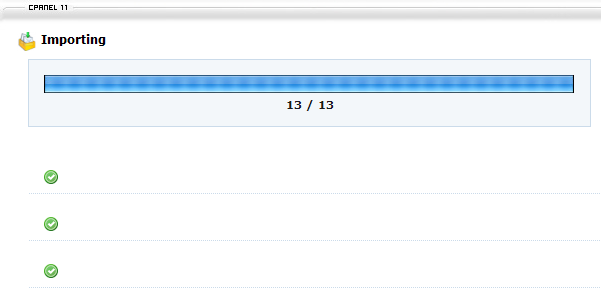
- Once import is completed, the blue horizontal bar will cover 100%, and all the listed aliases (forwarders) will have green check marks next to them. You are done. If you go to Forwarder icon in cPanel, you will see the newly imported forwarders listed.
Feel Free To Leave A Good Comment. :)
Look around this site and it's menus, and you may find other useful articles.