

- You are here:
-
Home

-
Computer Related
-
Development
-
Web Design
-
CMS
- Joomla
Joomla
Joomla, a CMS. Click on the big + sign to toggle the listing of categories and/or articles.
- Details
- Written by Tech Notes
- Category: Joomla
- Published: 21 June 2018
Fix For Getting Browser Insecure (unsecure/non-secure) Mix-Content Warning Message Due To Donate Elite Joomla Module
Introduction.
This article is not done in my usual well organized format with images, and clear guidance due to great lack of time, but because I believe many people may have this problem and not knowing it's related to the usage of the Donate Elite extension/module/component, I figured better to have something here than nothing.
I was going to post a question to Joomla about why Joomla is loading some insecure (unsecure/non-secure) images and CSS via http:// instead of https://, but then realized I was misreading the code, and they were https://, except for one place. This turned out to be, as mentioned in other Joomla forum threads, a hard coded URL path in the module code. Causes what's called "Mixed Content". I tracked the code to the Donate Elite module used on a Joomla website.
Please notice that this site is dependent on financial contributions (donations), and the ads on this website have very little financial contribution towards funding the creation of articles and website operation.
It took 1 to 2 hours to create this article. Doesn't include the many prior hours to figure out the problem and it's fix.
The Problem.
The module of Donate Elite has the Paypal image link hard coded as http://www.paypal.com/, and as a result if someone goes to https://TechNotes.whw1.com, a warning message was occurring and asking if the visitor wanted to show insecure items too, or only secured items to show. Most non-technical people, and many technical people too, get scared by this message and think of all kinds of scary things, and don't think it's just a picture that's being referenced as the "item", and will choose to show only secure items. This also resulted in the Green Padlock not showing next to the address of the website, and also problems for an unknown reason with the menu, which I am assuming got fixed along the way via cache clearing.
The Fix.
Fortunately, it was only a single file that needed fixing.
So, where is the file?
The file is located at YOUR-FILE-SYSTEM-PATH/modules/mod_donate_elite/tmpl. Don't respond saying you could not find that location because you used "YOUR-FILE-SYSTEM-PATH" as part of the path. The "YOUR-FILE-SYSTEM-PATH" portion needs to be replaced with whatever your hosting company's hosting provider or that particular server setup is. For example, Web Hosting With $1's (also abbreviated at WHW1 due to their domain), used by me, or at least the one for this examination at WHW1 had he full path of
/dedicated/server5369/u888/public_html/modules/mod_donate_elite/tmpl/default.php
. So, in my case, the "YOUR-FILE-SYSTEM-PATH" was replaced with "/dedicated/server369/888/public_html".
Once you find your way to that location (I just use WHW1's cpanel File Manger, but any 3rd party FTP software will do too), then edit the file default.php.
If you don't know what I mean by FTP, then you can reference WHW1's video tutorials page on free FTP softwares, and see a full list there and lead yourself to using one. I mention these things to avoid getting basic questions about such things, since I know all technical levels of people might be reading this, and I cannot assume everyone knows what an acronym or abbreviation I mention references.
Once you are editing the code, scroll way down and look for the code:
if ( $fe_c != '' ) {
  $doncd .= '<input type="image" src="http://www.paypal.com/' . $params->get( 'locale' ) . '/i/btn/' . $params->get( 'pp_image' ) . '" name="submit" alt="PayPal secure payments." />' ;
Replace the http://www.paypal.com/ with https://www.paypal.com/
After saving the edited file, then clear both the joomla caches and the browser cache, and reload the page, and hopefully you will no longer see the browser warning message about unsecure/insecure items and the green padlock now shows.
Consider Contributing
- Article Contribution:
Consider submitting an article of your own to Tech Notes. I will create a sub-category for your article if needed. Guest articles are welcome! - Financial Contribution:
If you found this article or any Tech Notes article useful, or beneficial in any form, and you'd like to make a financial contribution as a simple thanks (no fear, any small amount can be given), you can use the Paypal contribution button which is safe and does not require you to have a Paypal account to make a contribution to Tech Notes.
Feel Free To Leave A Good Comment,
And Donate. :)
Comment as a guest or site user.
Polite comments please.
Look around this site and it's menus, and you may find other useful articles.
Add this site to your Bookmarks/Favorites for easy return for new articles.
- Details
- Written by Tech Notes
- Category: Joomla
- Published: 23 March 2018
Wondering How To Allow A User To Create Articles Using Joomla's Frontend Interface?
Introduction.
You may be hear after spending hours trying to get Users or a single User or a Users of a Group to be able to edit and add new articles using joomla frontend. You may have already spent hours or days reading all the Joomla forums and various articles directing you to ACL, category changes, users changes, and group creations, and you have found that none it worked after many hours of searching and wasted video tutorial watching. I hope this is the answer for you.
Please notice that this site is dependent on financial contributions (donations), and the ads on this website have very little financial contribution towards funding the creation of articles and website operation.
The following is not for guest or public visitors being able to create articles, but for existing users. In other words for a registered user (a user with a profile).
Steps For User Article Creation Via Website's Front Interface.
- Assign a user to a group that can Create and preferably Publish (for example: Author, Editor, Publisher, Manager or a group you created that is given Create).
- On Joomla's backend control panel top menu, go to Users, and select Manage.

- Select User..
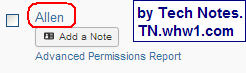
- Select Assigned User Groups tab.

- Assign user to a group that has Create permissions, and click on Save & Close button.
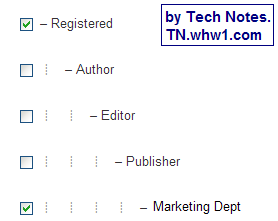
In this example, a custom group was created called Marketing Dept, and it was checked to add the user to the the group of Marketing Dept.
- On Joomla's backend control panel top menu, go to Users, and select Manage.
- Create a new category named something like New Articles. This is where newly created articles will be placed after creation.
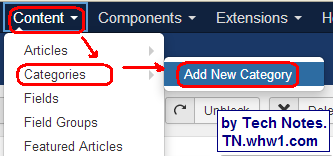
- On top menu, go to Content >> Categories >> Add New Category.
- Name category New Article, give it a description, select a Parent category or leave it as no parent if you want, select an Access Level that has the group you assigned the user to above. In this example, the Access level is named Marketing Dept, and it contains the Marketing Dept group.

- On top menu, go to Content >> Categories >> Add New Category.
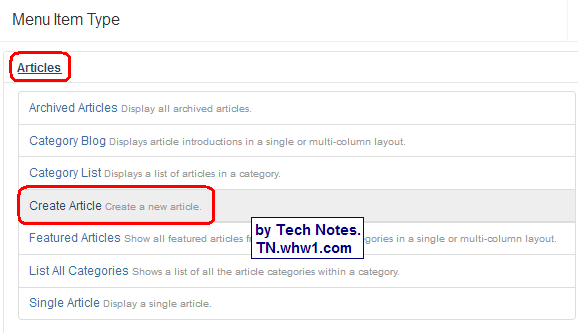
- Create a new menu item named Create Article (other good names are Make Article, or New Article), and give it the menu type of Create Article.
- Create a new menu item, and name it Create Article.
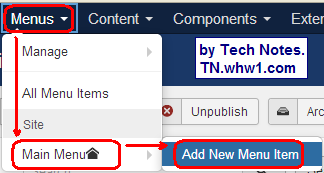
- Name it Create Article (or other name of your choosing), and select the parent menu, and the access level, and make the menu type as Create Article.
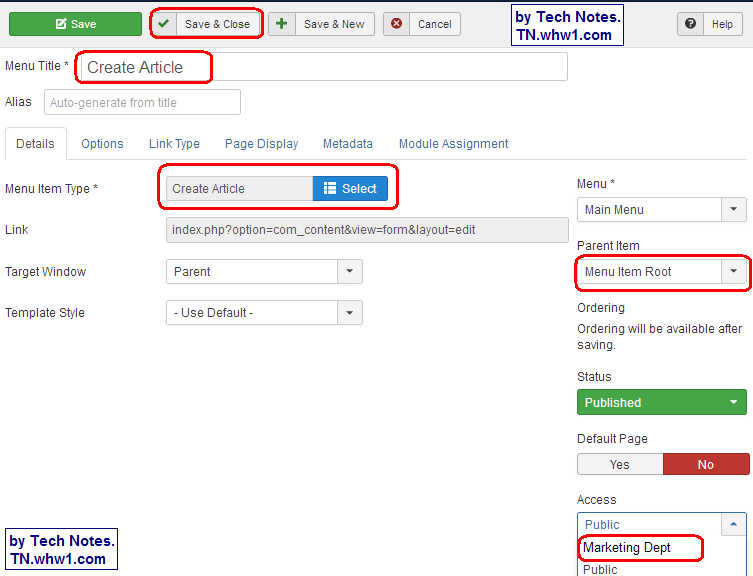
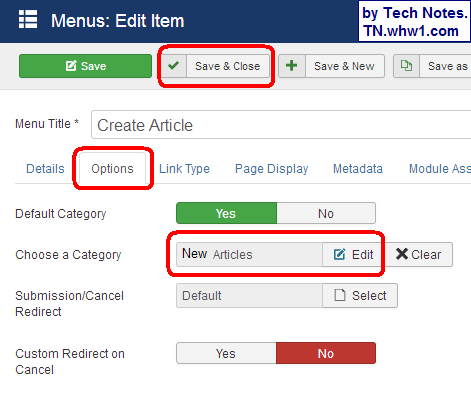
- Click Options tab, and choose the category you created above (in this example, it was New Articles category) for the Choose A Category field and Save & Close.
- Create a new menu item, and name it Create Article.
- Go to your website and reload/refresh the website page, and you should now see a new menu item named Create Article.
- Click on Create Article from your menu, and you will see a full edit interface show.

- Finished; enjoy. :)
Advice
I suggest creating another menu item using similar steps to above named something like "Incomplete Articles", or "Being Worked On", or "BWO Articles", or "New Articles", or "Newly Made". Hopefully you get the idea. Set the menu item as Category List and associate it with the category of New Articles or whatever you named your category in the steps above. Such a menu item then allows you to access New Articles category and edit articles that were started but not finished.
Consider Contributing
- Article Contribution:
Consider submitting an article of your own to Tech Notes. I will create a sub-category for your article if needed. Guest articles are welcome! - Financial Contribution:
If you found this article or any Tech Notes article useful, or beneficial in any form, and you'd like to make a financial contribution as a simple thanks (no fear, any small amount can be given), you can use the Paypal contribution button which is safe and does not require you to have a Paypal account to make a contribution to Tech Notes.
Feel Free To Leave A Good Comment,
And Donate. :)
Comment as a guest or site user.
Polite comments please.
Look around this site and it's menus, and you may find other useful articles.
Add this site to your Bookmarks/Favorites for easy return for new articles.
- Details
- Written by Tech Notes
- Category: Joomla
- Published: 25 November 2017
Change Joomla 3 From Email Address For User And Registration Notifications
Introduction
The following shows how to change the From email address and the From display name shown by emails your website sends out to users and for new user registrations.
Please note that I do not get paid to write these articles.
For reference, this article consumed about 1.5 hours to create.
Steps
- Login to Joomla control panel.
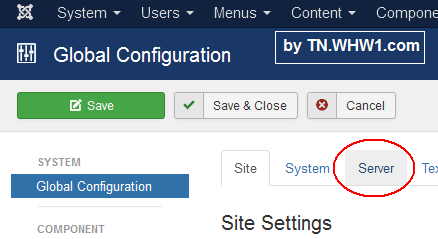
- Select from System menu, Global Configuration.
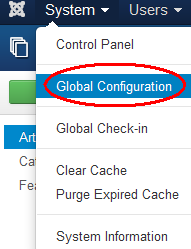
- Click on Server tab.
- Scroll down and look to the right side under Mail Settings.

- Change contents of "The From" field to the email address you want to be displayed when a system email goes out to users; including new registrations.
- Click on Save & Close button back near top left of page.
- Done.
Optionally, you can use the Send Test Email button below the Mail Settings to send an automated test email immediately by pushing that button, and the test email gets sent to the email address you put. This just tests that your server email is working with your joomla site and emails are going out and you get to examine an email that is received from the server. The test email will have the same From and To email addresses showing.
Makes sure that the email address you assign is an active email address before making use of it.
Consider Contributing
- Article Contribution:
Consider submitting an article of your own to Tech Notes. I will create a sub-category for your article if needed. Guest articles are welcome! - Financial Contribution:
If you found this article or any Tech Notes article useful, and you'd like to make a financial contribution as a simple thanks (no fear, any small amount can be given), you can use the Paypal contribution button which is safe and does not require you to have a Paypal account to make a contribution to Tech Notes.
Feel Free To Leave A Good Comment. :)
Look around this site and it's menus, and you may find other useful articles.
- Details
- Written by Tech Notes
- Category: Joomla
- Published: 09 March 2018
How To Add RSS Feed Of Your Joomla Website.
Introduction.
This is based on various Joomla 3.x versions. This is for when you want to provide an RSS feed of your article categories or pages. This allows people to subscribe via their browser or other newsfeed software, apps, and bots, and be informed when you have added a new article or content to your website. Don't get this confused with adding RSS feeds into your website of 3rd party RSS feed providers. If you want to know how to add an RSS feed content into your site, or an RSS feed link in your site's page, then please let me know. You can use the Comments section below.
Please note that I do not get paid to write these articles.
It took at least 3 hours to make this article.
Steps.
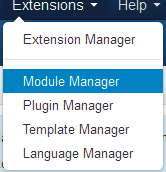
- Login to your website's Joomla control panel.
- Within the control panel menu, go to Extensions, then Module Manager or Module, depending on your version of Joomla.
 OR
OR 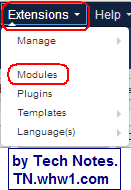
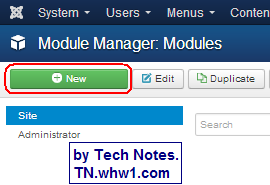
- Click New button.
OR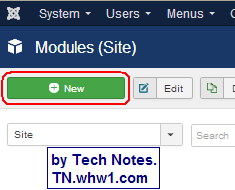
- Scroll down and select Syndication Feeds.

- Give it a Title Name for module, Text name to be displayed, and set "Show Title" to Hide (optional), and select location (position) to show the selection of the RSS feed. A position of Bottom, Footer, or Search works well, or you could give a new custom name for a position, and use that to have it show up within a page which this article does not get into. My experience has been that the Title does not show, even when set to Show, and so it shows somewhere, but I have not seen where, and I would not want a double labeling to occur with the Title and Text both being displayed. The Title seems to be a reference for this specific module copy, and the Text is what gets displayed on the website as a link. Indicate the item that shows first by using the Ordering menu
; you may need to first Save (not Save and Close) and then see your module name listed in the Ordering menu.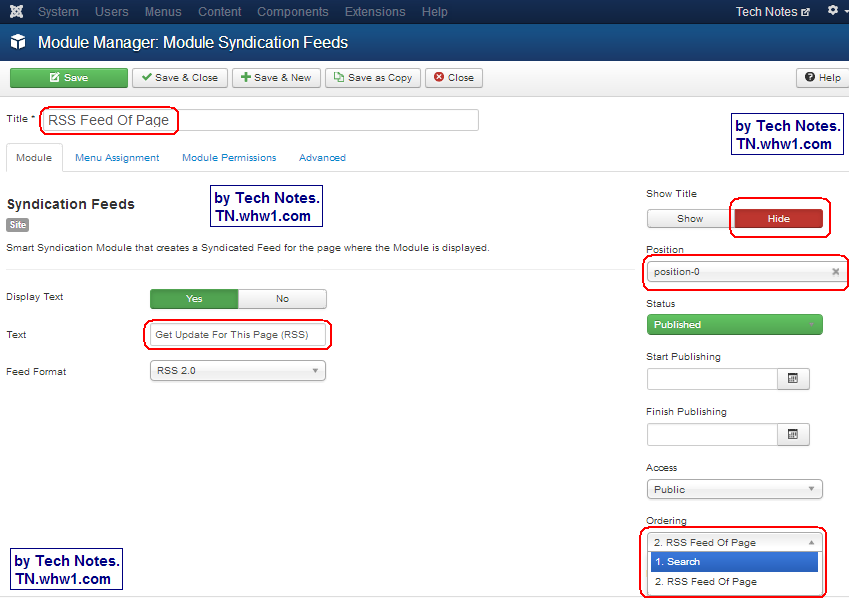
(example 1)
OR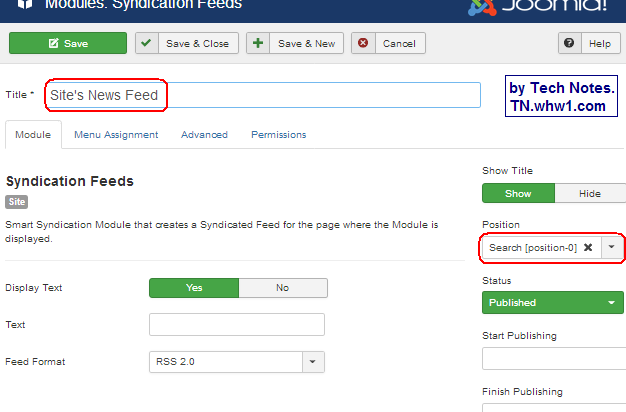
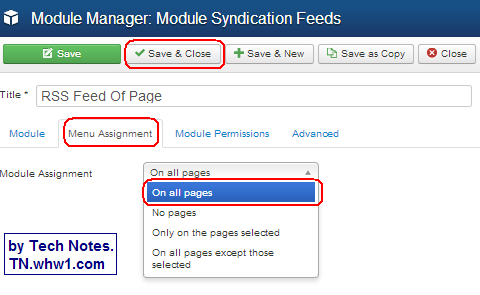
(example 2) - Click on Menu Assignment tab in that page.
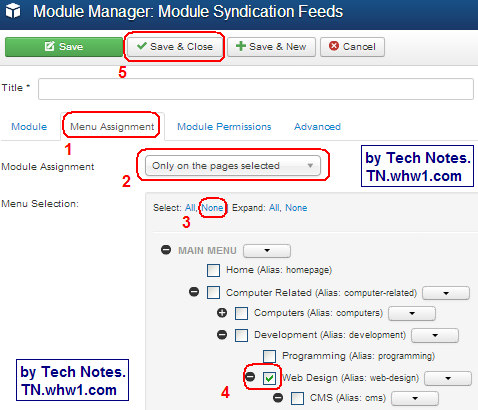
- Then from the pull-down menu, select "Only on the pages selected"; unless you want it everywhere, in which case you can select "On all pages"; read warning below, as it only shows on qualifying menu item pages.
- WARNING: Will ONLY be created for Menu Items that are of types like "Category Blog", and "Featured Article" as a Menu Item Type. For example, the RSS indication on a page will NOT show for "Single Article"and "List of News Feeds in a Category" Menu Item Type.
- WARNING: Will ONLY be created for Menu Items that are of types like "Category Blog", and "Featured Article" as a Menu Item Type. For example, the RSS indication on a page will NOT show for "Single Article"and "List of News Feeds in a Category" Menu Item Type.
- Then select the menu pages that are to show it.
- Click on Save & Close.
- Then from the pull-down menu, select "Only on the pages selected"; unless you want it everywhere, in which case you can select "On all pages"; read warning below, as it only shows on qualifying menu item pages.
- You are Done. If you choose the position of Search and choose the Ordering to show the Search module first, then something like this will show:

Consider Contributing
- Article Contribution:
Consider submitting an article of your own to Tech Notes. I will create a sub-category for your article if needed. Guest articles are welcome! - Financial Contribution:
If you found this article or any Tech Notes article useful, and you'd like to make a financial contribution as a simple thanks (no fear, any small amount can be given), you can use the Paypal contribution button which is safe and does not require you to have a Paypal account to make a contribution to Tech Notes.
Feel Free To Leave A Good Comment. :)
Look around this site and it's menus, and you may find other useful articles.
- Details
- Written by Tech Notes
- Category: Joomla
- Published: 15 October 2017
Easy Way To Have Your Joomla Site URL Be HTTPS.
Intro.
This article will show you how to easily have your joomla website have all traffic go to https version of your site and thus secure (encrypt) all data served out for your website. This WON'T require file modification, .httaccess change, FTP, File Manager usage of cpanel, or code hacking. It will be a simple (once you know it) setting change within your Joomla control panel. To get your site to use HTTPS does not require a URL or address change either.
Please note that I do not get paid to write these articles.
Personal reference: Article consumed 1.5 hours to make.
Steps below were tried on various Joomla 3.x versions. It should work for all Joomla 3 versions. If not, please let me know using the comments below or the contacts method.
Assumptions.
You have your digital SSL certificate installed for your site already. Either done by your hosting company, or by you or a server a server admin on a dedicated or virtual server. If you are realizing you need a SSL digital certificate, which is needed to have your site do HTTPS, you can get cost effective and reliable SSL certs that work globally at AstraGate Domain Services SSL Page.
Why You May Want This.
- You simply want your website content to be served out securely.
- Some modules, like social modules, break and don't show properly when you go to https version of your site; and you would like it all to show as https (secured) content.
- You got SSL certificate installed, but visitors to your site are getting browser warning that the "site is not secure", or "some content is not secured".
Steps.
- Login to your website's Joomla control panel.
- Select Global Configuration from the Systems menu.
- Select "Entire Site" from pull-down menu of Force HTTPS on the Server tab.
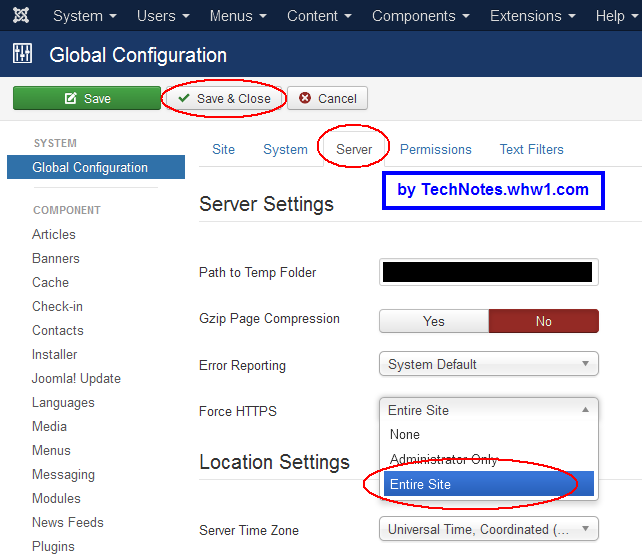
- Save & Close.
- Now go to your website without typing https in the URL, and you will see it automatically goes to the https version of your site.
Now, any content within your site, including social icons and links, all work and are encrypted, and your Internet browser is happy with the content, and search engines, like Google, won't complain about mixed content when you analyze the site via google, or Bing or other tools.
Consider Contributing
- Article Contribution:
Consider submitting an article of your own to Tech Notes. I will create a sub-category for your article if needed. Guest articles are welcome! - Financial Contribution:
If you found this article or any Tech Notes article useful, and you'd like to make a financial contribution as a simple thanks (no fear, any small amount can be given), you can use the Paypal contribution button which is safe and does not require you to have a Paypal account to make a contribution to Tech Notes.
Feel Free To Leave A Good Comment. :)
Look around this site and it's menus, and you may find other useful articles.
- You are here:
-
Home
-
Computer Related
-
Development
-
Web Design
-
CMS
- Joomla